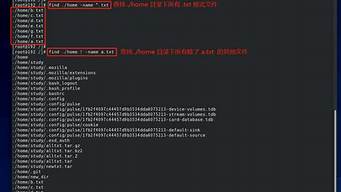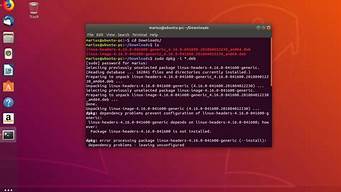
需要安装的软件:
1.	安装mysql
1.1安装编译器gcc
最小化安装,没有安装编译器
yum install gcc
yum install gcc-c++
如果不安装,在编译mysql的时候会出现【exec: g++: not found】错误

1.2安装ncurses-5.6.tar.gz,
tar zxvf ncurses-5.6.tar.gz
cd ncurses-5.6
./configure --prefix=/usr --with-shared --without-debug
make
make install

1.3安装mysql
tar -zxvf mysql-5.0.51a.tar.gz
cd mysql-5.0.51a
./configure --with-mysqld-user=mysql --prefix=/usr/local/mysql5 --with-charset=gbk --with-extra-charsets=all --without-isam --exec-prefix=/usr/local/mysql5
echo $?
Make clean
make && make install

1.4 初始化数据库:
groupadd mysql
useradd -g mysql mysql
scripts/mysql_install_db
cp /usr/local/mysql5/share/mysql/my-medium.cnf /usr/local/mysql5/var/my.cnf
cp /usr/local/mysql5/share/mysql/mysql.server /etc/init.d/mysqld
编辑my.cnf 把skip -federated注释掉
chkconfig --add mysqld
chkconfig --level 2345 mysqld on
chown mysql:mysql -R /usr/local/mysql5/
chmod +w /usr/local/mysql5/
service mysqld start
ln -s /usr/local/mysql5/bin/mysql /sbin/mysql
ln -s /usr/local/mysql5/bin/mysqladmin /sbin/mysqladmin

1.5 设定mysql密码
mysqladmin -uroot password "1111111"

1.6让系统找到mysql(如果必要的话):
PATH=$PATH:/usr/local/mysql5/bin
export PATH
echo "/usr/local/mysql5/lib/mysql" >> /etc/ld.so.conf
ldconfig

1.7测试
netstat -nplt | grep mysql
ps aux|grep mysql

1.8 授权用户权限
切记:@%代表在远程的权限,@localhost实际上只有在本机的权限
进入mysql
grant all on *.* to root@”%” identified by “111111” with grant option;
其他用户也可以这样设置权限

2.	安装apache
2.1编译安装
tar zxvf httpd-2.2.8.tar.gz
cd httpd-2.2.8
./configure --prefix=/usr/local/apache2 --enable-so --enable-rewrite
echo $?
make && make install
/usr/local/apache2/bin/apachectl configtest
/usr/local/apache2/bin/apachectl start
/usr/local/apache/bin/apachectl stop

2.2修改默认启动页
vi /usr/local/apache2/conf/httpd.conf
DirectoryIndex index.html 改为
DirectoryIndex index.html index.htm default.htm default.html index.php index.php3 index.jsp
#ServerName http://www.7966.org/ 改为
ServerName http://www.7966.org/

2.3 apache 开机启动的办法
#echo "/usr/local/apache/bin/apachectl start" >>/etc/rc.local(系统启动时服务自动启动)
测试:
在浏览器上输入127.0.0.1进入Apache test页面

编辑/etc/init.d/httpd
修改:
apachectl=/usr/local/apache2/bin/apachectl
httpd=/usr/local/apache2/bin/httpd
prog=httpd
pidfile=/usr/local/apache2/logs/httpd.pid
lockfile=${LOCKFILE-/var/lock/subsys/httpd}
RETVAL=0

5.安装PHP
5.1安装zlib
tar zxvf zlib-1.2.3.tar.gz
cd zlib-1.2.3
./configure
make
make install

5.2安装png
tar zxvf libpng-1.2.14.tar.gz
cd libpng-1.2.14
cp scripts/makefile.linux ./makefile
./configure –prefix=/usr/local/libpng
make
make install

5.3安装freetype
tar zxvf freetype-2.3.5.tar.gz
cd freetype-2.3.5
./configure
make
make install

5.4安装jpeg
tar zxvf jpegsrc.v6b.tar.gz
cd jpeg-6b
mkdir -pv /usr/local/jpeg/{,bin,lib,include,man/man1,man1}
./configure --prefix=/usr/local/jpeg --enable-shared --enable-static
make
make install

5.5 安装GD
tar zxvf gd-2.0.35.tar.gz
cd gd-2.0.35
./configure --with-png --with-freetype --with-jpeg=/usr/local/jpeg/
make
make install

5.6安装LIBXML2
tar zxvf libxml2-2.6.31.tar.gz
cd libxml2-2.6.31
./configure --prefix=/usr/local/libxml2
make
make install
cp xml2-config /usr/bin

5.7安装PHP5.2.5
tar zxvf php-5.2.5.tar.gz
cd php-5.2.5
./configure --prefix=/usr/local/php5 --with-mysql=/usr/local/mysql5 --with-apxs2=/usr/local/apache2/bin/apxs --with-jpeg-dir=/usr/local/jpeg --with-freetype-dir=/usr/local/include/freetype2 --with-zlib --with-png-dir=/usr/local/libpng12 --with-libxml-dir=/usr/local/libxml2 --with-gd --enable-ftp --enable-sockets
make
make test
make install

5.8配置
cp php.ini-dict /usr/local/php5/lib/php.ini
编辑/usr/local/apache2/conf/httpd.conf
加载php模块,去掉注释,有的版本是缺省就启用的。
LoadModule php5_module        modules/libphp5.so
加上下面两行
AddType application/x-httpd-php .php .phtml
AddType application/x-httpd-php-source .phps
编辑/usr/local/php5/lib/php.ini
设置php的session直接读取方式
register_globals=off 改成 on
设置php支持cookie
output_buffering = Off 改成 on

7.3 在apache网站的根目录下(/usr/local/apache2/htdocs/)新建index.php
<? php
  $ip=$HTTP_HOST;
  echo $ip;
?>
测试通过,OK
文章来源于网络或者作者投稿,若有侵权请联系删除,作者:老钟,如若转载,请注明出处:https://www.laoz.net/87.html